Orion
Well-Known Member
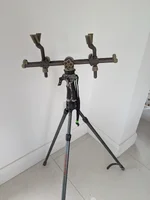
There are the original Primos sticks and the current Gen II models, which apparently differ in construction and operation. I have the Gen II bipod model so can't speak about the earlier ones. The Gen II mono and tripod models will be similar in operation but may have more or less securing screws to the bottom cover plate.
Starting at the top, but if it's just seized legs that are the problem you can skip down a bit.
The trigger mechanism inside the handle can be easily accessed by undoing the 2.5mm hex screw that is visible from looking up underneath the handle, and then releasing the grip inert to the rear. There is an adjustment within the handle for the trigger mechanism should you need to tighten up the travel - simply turn the knurled nut on the spindle.
View attachment 80306
View attachment 80307
When the trigger is operated it presses the spindle down through the swivel section of the sticks onto a moveable plate in the housing that the legs are attached to. For access, invert the sticks and remove the 2mm hex head screws and housing cover. The screws will have paint/laquer in the heads, so make sure the tool gets in for a good fit.
View attachment 80308
View attachment 80309
The legs are disconnected from the handle by removing the housing cover and the 8mm pivot bolts. Once out you can see the simple 'roller cam' arrangement fitted to the top of the leg that transfers the trigger movement to the internal leg release mechanism irrespective of the angle of the leg to the handle. The cam presses down in turn onto the retained head of a small diameter rod that passes all the way down through the top leg section to the locking piece at the end.
View attachment 80310
View attachment 80311
Leg strip. This is the procedure that most will need to rectify seized sticks. Secure the lower leg section in a padded vice, or wrap in cloth to avoid scratching. With a 'Boa' or similar type strap wrench (or water pump pliers wrapped in cloth etc.) loosen off the plastic ferrule between the telescoping sections - it's glued in place but will give without too much force if you keep at it. Once the seal is broken you can pull the lower leg section off to reveal the locking mechanism at the bottom of the upper leg.
View attachment 80312
This is centred and prevented from rattling around in the lower leg section by a black plastic sleeve and a circular white(ish) nylon insert on the end fitting.
If the mechanism is badly seized you may have to leave it soaking in a suitable solvent or penetrating oil for a time, but some brushing and manual manipulation should free it up.
View attachment 80313
While you're waiting for that to happen, here's a description of how it works:
When the trigger is pulled the 'roller cams' press onto the head of the small diameter actuating rod that passes all the way from the top of the leg, pushing a shaped captive end fitting down (below pic) which allows the small barrel shaped inserts you can see in the pics to retract away from the inner surface of the lower leg section - causing it to telescope if you are pressing downwards on the handle or extend if lifting up. Releasing the trigger retracts the shaped end fitting under some internal spring tension, (above pic) forcing the inserts out against the lower leg, locking it into position.
View attachment 80314
Once the components are free you can operate the leg mechanism by hand by pressing on the cam to check functioning, and a good clean and lubing of the moveable parts with a decent silicone grease should keep it operational for a long time. I suspect that a lack of lubrication on assembly, plus dowsing with things like WD40, can hasten the premature seizing in the first place.
Reassembly is in reverse order and you can either reinstall the plastic ferrules with a light contact adhesive, or tape them up for ease of access in the future. The 8mm pivot bolts tightness will dictate how stiff the legs are to deploy laterally.
Have fun!
Last edited: