
I'm a lefty mate! (All creative people are!) Just picked up a left hand Sako stock off eBay today so am looking forward to making moulds for it asap. I think it's a M591. Hopefully I'll be able to inlet it for the T3 and the 75.Would you look after us poor leftys if it took off☺.seriously though nice work
You are using an out of date browser. It may not display this or other websites correctly.
You should upgrade or use an alternative browser.
You should upgrade or use an alternative browser.
Carbon fibre stock project
- Thread starter takbok
- Start date

I'm making a duplicator so it's a possibility. Start saving lol!Another fine stock on the horizon mty , Very well done . just a pity you did't do a Browning A bolt in 270 stock as a test run

Another furlough beckons for July so I'm going to be busy.
hedge hunter
Well-Known Member
you the man takI'm a lefty mate! (All creative people are!) Just picked up a left hand Sako stock off eBay today so am looking forward to making moulds for it asap. I think it's a M591. Hopefully I'll be able to inlet it for the T3 and the 75.
hedge hunter
Well-Known Member
How long does a stock take you too make start too finish. Very interesting tacbok
I've only finished 2 yet, and maybe 2 weeks each just working on them here an there. But should be able to do one or two in a week if I don't have distractions like work etc.How long does a stock take you too make start too finish. Very interesting tacbok
Moulds take quite a bit of work at the start but you can make plenty stock once you have the moulds.
I'll have to sell an arm as i'v only got one good lung and one good leg

Kidneys?
")
alberta boy
Well-Known Member
Kidneys?
Beat me to it .............. what's a really abused kidney worth these days ?................ a friend of mine wants to know .
AB
I'm making a duplicator so it's a possibility. Start saving lol!
Another furlough beckons for July so I'm going to be busy.
A duplicator!! Now that is dangerous talk. I have a about three or four jobs that a a good duplicator is in need of! When will that be on line? I have some stock work ready and waiting!!
Cheers K
Yes that's me! But I only have two and last count I needed at least five or six! No just had another thought, make that seven!Beat me to it .............. what's a really abused kidney worth these days ?................ a friend of mine wants to know .
AB
K
pete evans
Well-Known Member
Looks really good. I have the majority of these materials that I could use the glass and carbon sheeting and the acrylic resin. We tend to use a plaster or foam mould and vacuum form a socket over the top (to form a prosthetic socket). There are a couple of areas of the process that I cant seem to get my head around looking at the photos. It looks as though you make moulds of the stock and seperate moulds of the inlet and then bond these together? If so how do you connect them and how do you align them? Could you put a materials list up? I have a sako vixen .222 A1 and would love to have a go at producing something like this. It looks pukka.
Hi Pete, I make silicone top and bottom moulds of the inletting from the existing stock. I clamp these over the new stock shell and pour the epoxy resin in to mould the inletting area (pour very little at a time as too much results in excess exothermic heat which will ruin your part)Looks really good. I have the majority of these materials that I could use the glass and carbon sheeting and the acrylic resin. We tend to use a plaster or foam mould and vacuum form a socket over the top (to form a prosthetic socket). There are a couple of areas of the process that I cant seem to get my head around looking at the photos. It looks as though you make moulds of the stock and seperate moulds of the inlet and then bond these together? If so how do you connect them and how do you align them? Could you put a materials list up? I have a sako vixen .222 A1 and would love to have a go at producing something like this. It looks pukka.
Some bits that I missed might be in this post:

Homemade fibreglass rifle stock - Sako 75 A1
My new stock is finally finished. I've posted a few pictures of the process on my 6x45 thread lately. A huge thank you to Adrian0100 on the forum who painted the stock for me FOC! I can recommend his work. The coating is air cure Cerakote in OD green - lovely finish (aside from the few air...
 www.thestalkingdirectory.co.uk
West System 105/205 epoxy for everything
West System 406 colloidal silica for thickening epoxy as required to fill tight corners and coat mould etc
West System 403 microfibres for thickening epoxy for strength when joining stuff
4 layers 200g Carbon cloth for stock halves and barrel channel
2 layers 50mm 240g carbon tape for the seams when moulds are bolted together (Use wooden dowel and bent piece of wire to get pre wetted bits into butt and onto seams
Vacuum bagging tube 600mm wide
Peel ply
Bleeder fabric
8 layers of 200g / 10 layers 165g fibreglass for the moulds
Polyurethane foam to fill butt and foreend
RTV silicone to make inletting moulds.
Plasticine for mouldmaking and for making dams when pouring silicone
Mould release wax & extra firm hold hairspray for release agent.
Plenty sandpaper
Cheap paintbrushes etc etc
die grinder with sanding wheels and cutting discs really help speed up mould trimming, buttpad grinding and prep.
Any other questions just shout or send me your number and I'll try to help. Look forward to seeing your results!!
East Coast Fibreglass is a one stop shop for all the materials and service is great.
Last edited:
pete evans
Well-Known Member
Hi Pete, I make silicone top and bottom moulds of the inletting from the existing stock. I clamp these over the new stock shell and pour the epoxy resin in to mould the inletting area (pour very little at a time as too much results in excess exothermic heat which will ruin your part)
Some bits that I missed might be in this post:
Homemade fibreglass rifle stock - Sako 75 A1
My new stock is finally finished. I've posted a few pictures of the process on my 6x45 thread lately. A huge thank you to Adrian0100 on the forum who painted the stock for me FOC! I can recommend his work. The coating is air cure Cerakote in OD green - lovely finish (aside from the few air...
West System 105/205 epoxy for everything
West System 406 colloidal silica for thickening epoxy as required to fill tight corners and coat mould etc
West System 403 microfibres for thickening epoxy for strength when joining stuff
4 layers 200g Carbon cloth for stock halves and barrel channel
2 layers 50mm 240g carbon tape for the seams when moulds are bolted together (Use wooden dowel and bent piece of wire to get pre wetted bits into butt and onto seams
Vacuum bagging tube 600mm wide
Peel ply
Bleeder fabric
8 layers of 200g / 10 layers 165g fibreglass for the moulds
Polyurethane foam to fill butt and foreend
RTV silicone to make inletting moulds.
Plasticine for mouldmaking and for making dams when pouring silicone
Mould release wax & extra firm hold hairspray for release agent.
Plenty sandpaper
Cheap paintbrushes etc etc
die grinder with sanding wheels and cutting discs really help speed up mould trimming, buttpad grinding and prep.
Any other questions just shout or send me your number and I'll try to help. Look forward to seeing your results!!
East Coast Fibreglass is a one stop shop for all the materials and service is great.
Thanks for taking the time to write this. I will have a look and may well have a crack at making one, you have set the bar fairly high in terms of result!
pete evans
Well-Known Member
Sorry fot the questions but
how do you stop the original stock sticking to the mould while capturing the fine detail of the checkering? you mentioned hairpray but this strikes me as counter intuitive.
Do you use a vacuum at any point?
I'm familiar with using 2 x PVA bags over a mould (one over mould then the layup then a second PVA bag and pour acrylic/epoxy between and draw down under vacuum. But not much use in this instance as you would loose definition and you destroy the cast/mould to remove it from inside.
Sorry fot the questions but
how do you stop the original stock sticking to the mould while capturing the fine detail of the checkering? you mentioned hairpray but this strikes me as counter intuitive.
Do you use a vacuum at any point?
I'm familiar with using 2 x PVA bags over a mould (one over mould then the layup then a second PVA bag and pour acrylic/epoxy between and draw down under vacuum. But not much use in this instance as you would loose definition and you destroy the cast/mould to remove it from inside.
I don't vacuum bag when making moulds. Only use vacuum bagging for making the stock halves and barrel channel.
I apply a good 4-5 coats of mould release wax to the stock inbetween buffing it to a shine. I use a stiff brush to work it into the checkering thoroughly. I then spray a few coats of extra firm hold hairspray, letting each coat dry before the next, which builds up a nice layer of solids that apparently helps mould release greatly - never had problems with mould release except for a barrel channel mould and I've since sorted that out by sanding, waxing, hairspraying etc.
Next step apply a thick layer of thickened epoxy with a brush, working it into the checkering to ensure no air bubbles and also filling any sharp corners generously with epoxy before laying up the fibreglass layers.
Bavarianbrit
Well-Known Member
I see no surface tissue mentioned, we used that behind the gelcoat to support the surface definition then chopped strand for our needs went on afterwards either polyester for finished items or epoxy resin for the mould.
The company Chavant are the suppliers for the clay car modelling studio business"s use as it is better than plastacine and as it is wax based is reuasable after warming it up in an old oven.
The company Chavant are the suppliers for the clay car modelling studio business"s use as it is better than plastacine and as it is wax based is reuasable after warming it up in an old oven.
Progress has been slow with full time job taking over this month. I'll try some resin infusion moulding on the weekend for a new stock and see how it goes.
I've received a beautiful left handed Sako 591 stock this week and am awaiting a Sako 75 Varmint that's in the post. Plenty to keep me busy during my July furlough.
I've received a beautiful left handed Sako 591 stock this week and am awaiting a Sako 75 Varmint that's in the post. Plenty to keep me busy during my July furlough.
I'm back in business after a hard month back at work (from home) - 4 weeks of composites and machining etc beckons (and hopefully a bit of stalking!!)
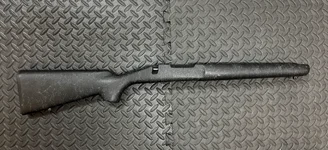
The birth of a Sako 75 AIII Hunter stock. I must have started just after 10am this morning and have just cracked it out of the moulds now.
It's certainly been a rollercoaster of emotions to get this far!


The birth of a Sako 75 AIII Hunter stock. I must have started just after 10am this morning and have just cracked it out of the moulds now.
It's certainly been a rollercoaster of emotions to get this far!
Last edited:
hedge hunter
Well-Known Member
Looking good takbok.look better in a left hand pal. Seriously though the stock looks brilliant mate
Similar threads
- Replies
- 2
- Views
- 183
- Replies
- 2
- Views
- 416

- Replies
- 9
- Views
- 1K


- Replies
- 0
- Views
- 362
