
You are using an out of date browser. It may not display this or other websites correctly.
You should upgrade or use an alternative browser.
You should upgrade or use an alternative browser.
Stress Relief Annealing cartridge brass
- Thread starter Alantoo
- Start date


1. To move further away from lower, potentially more variable results
2. To minimise dip time
3. To minimise any effect of heat loss in the salts to approach 1. above
1. Yes, results maybe slightly softer than new factory. But agreed, it is definitely the risk of hardness outcome variability between 250˚ and 350˚C with only a degree or two up or down which could be a problem and is to be avoided.
2 and 3. The advantage of the higher temperature is also the greater tolerance you have for any slight variations of temperature or dip time...the rate of reduction of hardness continues to level off above 400˚C just not as dramatically as below.
Alan
Alan,
Here you are
David
Looks very tidy.
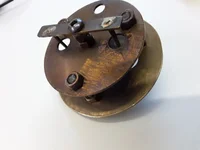
Couple more questions...I took a bit of time to see what was going on with the case holder...the last photo just happens to be at an angle so that (what I now think are) the case guide pins, they unfortunately align with the lifting eye in the photo and it looked like a continuous staple...I couldn't figure out what was going on!
The case rests on the support bar, and as that is at the salt bath temperature it all works together.
The presence of the lifting eye and hook would indicate that there is some heat transfer via the spacer bolts to the top plate...what temperature does the top plate get to and are the cases able to be heated by contact with the top plate?
I did notice you mention the use of the soap tell tale to monitor heat transfer up the case so presumably this has not proved to be a problem.
Alan
Last edited:
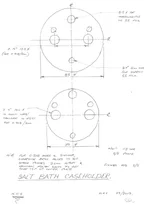
The top plate at the design diameter just rests in the curved lip of the pot. The next plate down in the drawing is set on 3 No. bolts, 1" below. The case holes in that lower plate are of a diameter such that they impinge mid-way on the shoulder of either a .308W or a 6BR.Looks very tidy.
Couple more questions...I took a bit of time to see what was going on with the case holder...the last photo just happens to be at an angle so that (what I now think are) the case guide pins, they unfortunately align with the lifting eye in the photo and it looked like a continuous staple...I couldn't figure out what was going on!
The case rests on the support bar, and as that is at the salt bath temperature it all works together.
The presence of the lifting eye and hook would indicate that there is some heat transfer via the spacer bolts to the top plate...what temperature does the top plate get to and are the cases able to be heated by contact with the top plate?
Alan
What is not shown on the sketch is the lower bar with two guide pins - not entirely necessary but just help a little to ensure first time insertion.
The salts are 1" below the top of the pot so the level is just awash of that second plate.
The top plate gets very hot, not sure what temp but not enough to transfer heat into the case body as checked with soap.
I put the lifting eye in so that if necessary I can lift it out to replenish salts, although after 100 cases or thereabouts it took a teaspoonful to do that. I also use it to lift it out when finished and drop it into the rinsing pot. Just make sure the pot is on the floor and so avoid risk of water splashing into the salts.
David.
The top plate at the design diameter just rests in the curved lip of the pot. The next plate down in the drawing is set on 3 No. bolts, 1" below. The case holes in that lower plate are of a diameter such that they impinge mid-way on the shoulder of either a .308W or a 6BR.
What is not shown on the sketch is the lower bar with two guide pins - not entirely necessary but just help a little to ensure first time insertion.
The salts are 1" below the top of the pot so the level is just awash of that second plate.
The top plate gets very hot, not sure what temp but not enough to transfer heat into the case body as checked with soap.
I put the lifting eye in so that if necessary I can lift it out to replenish salts, although after 100 cases or thereabouts it took a teaspoonful to do that. I also use it to lift it out when finished and drop it into the rinsing pot. Just make sure the pot is on the floor and so avoid risk of water splashing into the salts.
David.
Gotcha. My edit/addition re the soap guide and your post crossed in the ether. I missed the note on the sketch re. the 10mm hole, and jumped to the conclusion that the case mouth rested on the bar...which would work also I guess...but the lower plate also gives you a handy salt depth indicator.
Alan
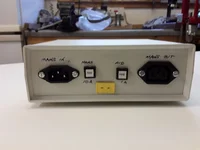
If you feel tempted to build one and need further pics for clarification, including one of the enclosure for the PID and connections just let me know.Gotcha. My edit/addition re the soap guide and your post crossed in the ether. I missed the note on the sketch re. the 10mm hole, and jumped to the conclusion that the case mouth rested on the bar...which would work also I guess...but the lower plate also gives you a handy salt depth indicator.
Alan
David
This is case holder I built back in March for the Lee pot with the height adjuster......

And I’ve built this with the invaluable guidance of Pinkfoot and popsbengo over on the ukv thread on salt annealing....

Just in the process of getting up and running..... turns out the PID and the solid state relay are incompatible despite initial advice from the Company. But this afternoon, the techie guy there has rung me back and worked out a way round that....
About to go out to the garage, make the changes and try it.... got some leds and resistors arriving tomorrow so I’ll wire that in to show when there’s power to the output socket and the pot is heating.
Cheers
Fizz
And I’ve built this with the invaluable guidance of Pinkfoot and popsbengo over on the ukv thread on salt annealing....
Just in the process of getting up and running..... turns out the PID and the solid state relay are incompatible despite initial advice from the Company. But this afternoon, the techie guy there has rung me back and worked out a way round that....
About to go out to the garage, make the changes and try it.... got some leds and resistors arriving tomorrow so I’ll wire that in to show when there’s power to the output socket and the pot is heating.
Cheers
Fizz
Well done Pete!This is case holder I built back in March for the Lee pot with the height adjuster......
View attachment 129467
And I’ve built this with the invaluable guidance of Pinkfoot and popsbengo over on the ukv thread on salt annealing....
View attachment 129466
Just in the process of getting up and running..... turns out the PID and the solid state relay are incompatible despite initial advice from the Company. But this afternoon, the techie guy there has rung me back and worked out a way round that....
About to go out to the garage, make the changes and try it.... got some leds and resistors arriving tomorrow so I’ll wire that in to show when there’s power to the output socket and the pot is heating.
Cheers
Fizz
Deep fried Mars Bars all round!!!
David
Ta daaaaa!
It works!
Water in the pot, Target temp set to 53c initially and it overshot to 81c with the pot’s residual heat... re-set it to 73c and it cooled to 72 before turning the heat back on for a short period, up to 77 and it’s now settled on 73 with a 1 second burst every 20secs. AI rules ok!
So, I think I’ll initially set the salt for something like 480c let it overshoot and re-set ‘til it’s stable at 525c and start annealing.
Result
Keeps me off the streets!
Last edited:
Pete,This is case holder I built back in March for the Lee pot with the height adjuster......
View attachment 129467
And I’ve built this with the invaluable guidance of Pinkfoot and popsbengo over on the ukv thread on salt annealing....
View attachment 129466
Just in the process of getting up and running..... turns out the PID and the solid state relay are incompatible despite initial advice from the Company. But this afternoon, the techie guy there has rung me back and worked out a way round that....
About to go out to the garage, make the changes and try it.... got some leds and resistors arriving tomorrow so I’ll wire that in to show when there’s power to the output socket and the pot is heating.
Cheers
Fizz
The led will confirm power is going to the Lee pot but it will not confirm the pot is heating. See my post to you regarding the Lee thermostat cutting out due to high localised ambient temp..
David
Thanks David,Pete,
The led will confirm power is going to the Lee pot but it will not confirm the pot is heating. See my post to you regarding the Lee thermostat cutting out due to high localised ambient temp..
David
Yep, thanks for the email and points duly noted
The idea of the led at that point was to confirm that the PID/SSR were working and the pot was getting power... I’ll be keeping a close eye on the Thermocouple temperature to monitor the pot’s thermostat.Cheers
I will be interested to see the results of your comparison.
By the way if anybody wants a pot of 750˚F / 399˚C Tempilaq I have one here they can have it at a good price...only used once for the above experiment!
Alan
I DO realise that this is from a thread nearing two years of age, but if that bargain bottle of Tempilaq is STILL available from your workshop I would like to purchase it from you please!?.. - assuming it hasn't dried up or gone off or whatever Alan??
ATB, Blobby159.
I DO realise that this is from a thread nearing two years of age, but if that bargain bottle of Tempilaq is STILL available from your workshop I would like to purchase it from you please!?.. - assuming it hasn't dried up or gone off or whatever Alan??
ATB, Blobby159.
Yes as far as I know it is fine. I am looking at now and it is still liquid...PM your address
Alan
Talk about resurrecting an old thread...!! but I would like to tell my sorry tale of annealing....
I'm a skin-flint.... so when some of my .223 cases started neck splitting during reloading i decided it was time to look into annealing...
I found some plans on a US site, and made my own gas powered annealing machine. This weekend i used it "in anger" for the first time, and I think I've ruined a couple of hundred .308 cases..!!
I bought some Templiaq liquid for the correct temps, tried it out on some scrap brass, got the heat exposure time all set up, then ran some clean .223 brass through it. That turned out fine, with the distictive anneal line just below the shoulder.

Excited at the success, I then turned to my .308 brass... tried a few scrap cases with Templiaq, then put some clean .308 cases through... lovely..!!
I though that while I'm at it, I'll do all my brass, so picked up a box of dirty (carbon deposits around the neck) .308 brass and ran that through the annealer, then when it had cooled, i ran it through the cleaner.
As usual, the brass came out lovely and shiny, but my heart sank when I realised that the necks of the cases had turned a coppery colour, which I knew from my research into annealing meant that the necks had gotten too hot and the zinc had been burnt out... making them useless...
The clean ones worked fine, the dirty ones were now scrap.... all i can think of is that the carbon around the necks increased the temps somehow...??
The ones on the left were annealed clean, the ones on the right were annealed dirty, then cleaned..

So CLEAN YOUR BRASS BEFORE ANNEALING...!!!!
.. I'm now searching for new brass...
I'm a skin-flint.... so when some of my .223 cases started neck splitting during reloading i decided it was time to look into annealing...
I found some plans on a US site, and made my own gas powered annealing machine. This weekend i used it "in anger" for the first time, and I think I've ruined a couple of hundred .308 cases..!!
I bought some Templiaq liquid for the correct temps, tried it out on some scrap brass, got the heat exposure time all set up, then ran some clean .223 brass through it. That turned out fine, with the distictive anneal line just below the shoulder.
Excited at the success, I then turned to my .308 brass... tried a few scrap cases with Templiaq, then put some clean .308 cases through... lovely..!!
I though that while I'm at it, I'll do all my brass, so picked up a box of dirty (carbon deposits around the neck) .308 brass and ran that through the annealer, then when it had cooled, i ran it through the cleaner.
As usual, the brass came out lovely and shiny, but my heart sank when I realised that the necks of the cases had turned a coppery colour, which I knew from my research into annealing meant that the necks had gotten too hot and the zinc had been burnt out... making them useless...
The clean ones worked fine, the dirty ones were now scrap.... all i can think of is that the carbon around the necks increased the temps somehow...??
The ones on the left were annealed clean, the ones on the right were annealed dirty, then cleaned..
So CLEAN YOUR BRASS BEFORE ANNEALING...!!!!
.. I'm now searching for new brass...
Talk about resurrecting an old thread...!! but I would like to tell my sorry tale of annealing....
I'm a skin-flint.... so when some of my .223 cases started neck splitting during reloading i decided it was time to look into annealing...
I found some plans on a US site, and made my own gas powered annealing machine. This weekend i used it "in anger" for the first time, and I think I've ruined a couple of hundred .308 cases..!!
I bought some Templiaq liquid for the correct temps, tried it out on some scrap brass, got the heat exposure time all set up, then ran some clean .223 brass through it. That turned out fine, with the distictive anneal line just below the shoulder.
Excited at the success, I then turned to my .308 brass... tried a few scrap cases with Templiaq, then put some clean .308 cases through... lovely..!!
I though that while I'm at it, I'll do all my brass, so picked up a box of dirty (carbon deposits around the neck) .308 brass and ran that through the annealer, then when it had cooled, i ran it through the cleaner.
As usual, the brass came out lovely and shiny, but my heart sank when I realised that the necks of the cases had turned a coppery colour, which I knew from my research into annealing meant that the necks had gotten too hot and the zinc had been burnt out... making them useless...
The clean ones worked fine, the dirty ones were now scrap.... all i can think of is that the carbon around the necks increased the temps somehow...??
The ones on the left were annealed clean, the ones on the right were annealed dirty, then cleaned..
So CLEAN YOUR BRASS BEFORE ANNEALING...!!!!
.. I'm now searching for new brass...
Don't throw them away whatever you do...they are not ruined.
Have another read of the very first post in this thread...
It is an internet myth that you can alter the 70%copper 30%zinc alloy proportions at annealing temperatures. If it was true, it would be impossible to silver solder or cast brass without converting it to copper at the much higher temperatures required for those processes.
You cannot "burn out the zinc" from brass....unless it was held in a molten state for a considerable time.
Even if you had fully annealed the necks to red heat 600˚C, provided the head is not affected they will be perfectly usable. They may be softer than OEM and so may provide less neck tension, but case to case within the batch they will be similar. They will even obturate better. They will also toughen up with subsequent firings and resizing through work hardening.
Looking at the colours on your photos and as you were using the same timing as with the cleaned cases, what system do you use for cleaning? If you just use a strong pickle solution on an un-annealed case the zinc on the surface will be removed leaving the warmer coppery colour...if you just give them a spin in the drill with a bit of Autosol polish the brass colour will come back immediately...the coppery surface is only tarnish thickness deep.
If they have gone through your machine at the same settings you will find if you try resizing a few you will feel in the press that they are the same as the others...it is still brass.
Do you have any photos of your machine?
Alan
p.s. I will just add that the simple system I suggested of using a wipe of soap on each case neck and heating until that goes black does ensure that any problems arising from variations of timing batch to batch are eradicated...
Last edited:
Thanks Alantoo.
Cleaning is in an untrasonic cleaner, using an additive specifically for brass... I use that for all my rifle brass with no previous problems...
If you look at the middle case on the right, you can see that the copper colouring is patchy, so its only discoloured where the carbon fouling was on the neck... so the carbon did something...
I used 399C/750F Templiaq, with a dot inside the case mouth, and another halfway down the outside of the case to make sure the heat didn't travel too far.
Once I had the machine speed set so that the dot inside the mouth went clear just as the case dropped out, I then ran the whole bach through at the same setting.
I made a video while the machine was running...
Video link
https://youtu.be/-DaojieJr_M
Last edited:
Nice machine...good job...mesmerising!
As I said just try spinning a pre-cleaned and a post-cleaned case up with a bit of Autosol and see if you can see a difference, and also try both of them through your resizing die to see if you can feel a difference.
If they have gone through your machine on the same settings I am 100% sure that you will not find a difference in either instance...and they will work just fine.
Alan
Similar threads
- Replies
- 10
- Views
- 498
- Replies
- 14
- Views
- 847
