Knife project #7 - my first commission: Local scout leader wants a short bladed Karesuando

zambezi

Well-Known Member
Exciting times. Lockdown has jumpstarted my knife-making and simultaneously introduced me to a number of folk in the community who use knives in their work and who appreciate a good working blade.

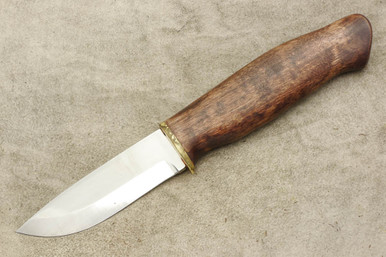
A local scout leader has been chatting to me about his knife requirements. He already has a full tang bushcraft knife for the heavier work [batoning, green wood working, etc] but realises that whittling and rope work would probably be easier with a smaller blade. None of the commercial options available quite tick the box, so we started designing his ideal knife.

I am going to make no charge for this knife. He will pay for materials only. Mostly that is because I am in awe of the self-sacrificing work scout leaders do and want to contribute to that work, albeit tangentially. I cherish the skills and awareness I gained from the scouting movement in my youth. But should I ever wish to make this a business, having a "lost leader" being showcased in scouting circles won't hurt either.

The starting point for discussions was that something between a Pukko and a small Karesuando would be the direction to go. Blade circa 8cm, slender spine, ergonomic handle, hidden tang construction, brass bolster, scandi grind, leather sheath...

Whilst it probably not look exactly like any of these, the scout leader has identified aspects of each he likes. Watch this space...


I am going to make no charge for this knife. He will pay for materials only. Mostly that is because I am in awe of the self-sacrificing work scout leaders do and want to contribute to that work, albeit tangentially. I cherish the skills and awareness I gained from the scouting movement in my youth.
Cracking gesture. Well done.

K
 
Very kind, it could definitely kick off into a business if you wanted to and pushed for that I am sure there would be some market out there for them.
 
First up I have added two new pivot sockets to my knife filing jig nearer to the board's midway point. This should allow the file to address the workpiece at an steeper angle. Hopefully an angle that will deliver a 4-5mm scandi grind bevel on the 3.2mm bar stock. [the pivots at top of the board deliver flat grinds]

First sketch of a possible Karesuando shape. It is not wowing me. I will doodle a few more permutations a.m. before breaking out the cutting tools.


IMG_5725.webp
 
The lovely folk at GFS made a steel delivery just before Christmas. So rather than make another RWL34 blade, I now have some AEB-L to play with...

It is a great stainless steel at a very accessible price. But there are any number of recipes for hardening it. See below. As best I can deduce from the sum of all of those is the recipe I have devised in graphic form below. Any other AEB-L experts out there with experience? Knowing what worked as well as the fails would be good.


AEBL_heat_treat_62Hrc.webp
 
I recently took delivery of a two-burner forge to take over duties from the single I had been borrowing. Per a previous thread, the original wee thing looked under some stress when run at 1000°C for any length of time. The new one should get to temp quicker plus it has a fire cement inner liner which should enhance outer case longevity at sustained higher temps IMG_5744.webp.

The other challenge I had to manage before starting this scandi-grind project was to find where on my file-jig the pivot-eye should go to deliver an appropriately angled bevel. It may well be that maths could work it out, but trial-and error did it for me. I used the profile of manufactured knives to inform how deep the bevel should be for a given knife spine width. Next I drilled potential pivot points IMG_5740.webp, marked some scrap 3.2mm steel with a median line and started filing.

On the third attempt the resultant bevel looks viable for 3-4mm barstock.IMG_5742.webp So, next order of business on this project is to finalise blade design, and start cutting some AEB-L AEB-L.webp
 
Rummaging through the garage has thrown up some re-cycling gold: old brass door handles.

The handles have some heft to them and will make great donor metal for the bolster/guard:

IMG_5745.webp
 
With the blade shape kinda finalised, it was time to transfer sketch to a rigid plywood former IMG_5752.webp. Next I considered the shape of the handle and what components might sit well together.

I think that recently acquired bog oak slab and some Fallow antler with brass spacers may be just the ticket IMG_5749.webp

For clarity, this is how I think they may wed: IMG_5751.webp

And my plan to make the hidden-tang-to-handle marriage secure is to machine some "glue barbs" into the tang: tang_barbs.webp
 
Good progress: template transferred to steel and cut out using M42 blade on bandsaw IMG_5755.webp IMG_5756.webp. But....note all the brass swarf on the table. Not good. The issue is that if I gently offer bar stock up to blade, it heats and hardens very quickly due to friction. It is then nigh on impossible to cut.

The cleanest and most controlled cuts are when I thrust the workpiece into the blade purposefully. The downside is that the rearside of the blade then attacks the rear brass guide. Any wisdom?

The rest is all good. I have cleaned the workpiece by handsanding on a plate of greenhouse glass topped with 150 grit wet-n-dry IMG_5762.webp. All but a few dimples to go IMG_5768.webp. I will finish that a.m. and move on to the bevels.

The cheapish steel forges I have been using are fine but heavy use will probably kill them in a shortish space of time. So I ordered some fire bricks which arrived today IMG_5771.webp. I plan to build a forge from them by encasing them in an angle iron cage. Project for another time. Pending that, the bricks help to shutter the ends of the existing forge to aid heat retetion.
 
The blade guides on the bandsaw are all brass. That is fine for the guides on each side of the blade, I never flex the blade sideways in use. But the rear guide really needs to be a proper back stop, not a disk of waste metal. What I may do is add the steel backstop you find on jigsaws...Jigsaw_blade_guide.webp
 
I have just been out in the workshop and took a few pics as examples for you, the cleaner looking pics are vertical bandsaws like yours, and the last 2 pics (excuse the swarf) is the metal cutting one (horizontal), a pic is easier than an explanation, hope these help.

IMG_20201231_181816.webpIMG_20201231_181840.webpIMG_20201231_181859.webpIMG_20201231_181931.webp
 
Prompted by your pics, I went to have a closer look at the bandsaw blade guides. All the guide fittings are brass, but the rotary saw-blade guide discs are all steel.IMG_5772.webp i.e. anything the blade might touch is steel. IMG_5778.webp

So...where did the brass filings come from... I now wonder if the last metal cutting chore was brass and in cutting steel today I dislodged brass swarf from the blade's teeth accumulated during previous usage. I certainly cannot find any other source for the brass filings.
 
I don't have an answer for you there I'm afraid, but looking at you first pic I would say the blade guides need adjusting so that they are just touching the band, any gap and I get the blade wandering on deep cuts.
Just a thought, take the guards off and see if there is any brass on the wheels, when I cut a lot of soft wet wood I get build up on the wheels, might be the same with brass?
 
looking at you first pic I would say the blade guides need adjusting so that they are just touching the band

I always detension the blade when I shut unit down for the day. So the blade is off center in this pic because it is detensioned. Guides are set to hover just off the blade when tensioned. But always worth pointing out anything you spot.

I will hoover all swarf before next cut and review thereafter.
 
I am beginning to think that pressing my wood-optimised bandsaw into steel cutting duties is probably unwise. The maker rates it for light metal cutting. [it is a vario-drive, but the slowest speed is possibly still a little quick for metal cutting]

What I am beginning to think is that I should get a dedicated metal bandsaw. Any suggestions on best knife-maker's option?

I am currently considering this one:

 
Sorry, I'm no help on that one, I have the table for ours somewhere but have never used it, always thought it would be awkward with the base where you want to stand, my option is to rough cut with a plasma cutter, and then go to the belt grinder to get the final shape
 
In what became a very abreviated trip to the garage, I managed to polish the knife blank to 320 grit and set it up in the knife jig. [Immediately thereafter the rest of my day was spoken for by SWMBO]

But I thought I would post these images to explain how I maintain mirror image file-attack-angle when flipping the workpiece in the knife jig.

First up I freehand a median line on the edge to be filed. Next the work is offered to the table such that the section to be bevelled is roughly bisected by the median line on the table [corresponds to the file pivot point] IMG_5783.JPG. I.e. the arc of the file should address all parts of the bevel equally. In this case I used the tang-bolster right-angle as a reference point at one end IMG_5782.JPG and the tip at the other and marked the table accordingly IMG_5781.JPG. Finally, I placed a mark on the spine that aligned to the table's median line IMG_5780.JPG. The knife was then clamped and the first bevel started. When the workpiece is later flipped over to file the obverse, all I have to do is first line up the spine mark and then manouver the tang-bolster right-angle and tip to align to the table's edge. Thus the file will address both sides in the same attitude. IMG_5784.JPG This is critical for symmetry of grind, not least the plunge line nearest the bolster. Almost hidden by the clamp in the last image is the file-stop that assures plunge line fidelity. That is moved when I flip the piece and repositioned after the workpiece is clamped. Its position is selected to deliver the same bolster to plunge line dimension as per the first side.


Hopefully tomorrow will be uninterrupted garage time. Who knows, finish bevels? Heat treat? Start on multi-part handle?
 
Last edited:
I am looking to harden this knife to 62Hrc. The last knife I heat-treated to 62Hrc was a real challenge to sharpen.

So...on this blade I have decided to take the blade very close to final profile before heat treat. It is an experiment really. Experience shows that HT always causes significant clag build up which has to be machined of later. That fact would seem to negate the investment of so much pre HT finishing.

However, my experience is that the clag is softish compared to the actual blade. Si I am hoping I have a winning combo.

Anyhoop, the sequence today is that I applied rough bevel to one side IMG_5791.JPG, checking the median line often IMG_5785.JPG and then flipped and clamped work piece using reference marks IMG_5794.JPG . I moved the file-stop and started the bevel on the opposite face IMG_5796.JPG. I then used my 800 grit stone to clean up the bevels and facesIMG_5798.JPG. The eagle-eyed amongst you will spot an error in the next image...
 
Back
Top