Freeforester
Well-Known Member
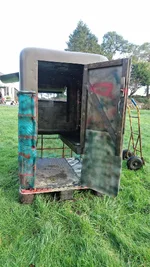
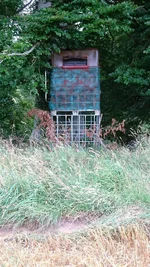
Okay, was inspired by the earlier high seat made out of two IBC containers, shown on the directory here a while back, but us Grampian boys are a bit hard bitten, and so I decided to make two out of two containers!
There's about 10 parts and a wee bit of fixings. Sitting comfortably? Then I'll begin.
1 x IBC container
2 x(or if you're feeling flush, 4!) fence posts
4 x 4"x 2" by appx 48" or less, depending on your own height and preference, with an eye to wind strength too, see later.
1 x pallet (can be pre-loved!)
1 x piece of Sterling board (or ply, disorientated strand board, etc!) about 5' x 2'6" to tack the roof on to;
1 x 3m sheet of steel cladding or Corrie iron, cut in half across, use whatever you have to hand or can obtain
couple lengths of 4" x 2" x50" or so - roof bearers
some tek screws, screws and flat washers, some strapping-on-a-roll
an old 5 gallon drum or similar for seat (bring a bit of padding according to your need!)
tins of tartan or real tree paint, to suit your environment and preference
Now put them all together, and it should look something like this:
View attachment 90462
Dissemble the cage bars bars which prevent the plastic container from 'escape'! An 8mm tek driver for the cordless drill is helpful and much quicker than a wee spanner. You may need an Allen bolt bit, depending on the type of nuts the cage bars are held in place with.
Once your container is free, cut out holes top, base and one side, according to where you envisage entry and exit, this one shown has the entry point on the leeward side of the prevailing wind. I left about 6" of a lip all round, I measured 6" in from the sides of the container and drew lines with a felt pen, and radiused the corners because I wanted it to be tidy, and was using a jigsaw to cut them out, but eg a chain saw and a steady hand would be much quicker and pretty much as good!
The lengths of 4' 4x2 for the uprights are then screwed into place from the inside, using 4-6 screws (5x60 or 50 are plenty) with penny washers to spread the tension from the screws and add grip, and roof pitch according to preference, I think there's a couple inches higher at front sloping to back on mine. From the top edge of the container, 22" at the front, and 20" at the back gives a decent run for the water over the back. I used the edges of the entry hole I had cut out as a guide to keep the uprights fairly vertical. On the other side, I just marked the alignment with a felt pen, which shows through to the inside of the container, it being slightly translucent.
Once the uprights are in place, I checked out an inch over the ends of the roof bearer 4x2's just to give a decent hold to the uprights, and screwed these on with some screws, plus a couple of lengths of strapping to firmly secure same.
At this point I gave the surface a going over with the blow torch, to help key the undercoat to the plastic. Lightest coat first, dead grass or agri undercoat sandy colour, then a bit of light olive, green bronze, and a little drab brown, I'm no Banksy, but it's fun, and less is often more! On the uprights you may see a few tek screws, I put these in to hold a bit of scrim netting to further blend in the cage, but I also anticipate the grass to gradually and eventually grow!
I assembled the roof on site, which makes the whole thing easier on the back of the trailer. Note that if you have a trailer that can accommodate only one container, you might be best to assemble all on site, as once the roof upright supports are screwed on, you won't be able to slip the plastic shell back into the cage. An 8 foot trailer will easily take the cage and container though, with the pallet under the cage for transport.
For the roof, I laid the piece of Sterling board over the roof supports, and screwed it down with 5x 30 screws. Next the two pieces of cladding were overlapped and fixed using 25mm tek screws, the ones with pointed ends for attaching cladding to wood. Lastly the loose sides were pulled down about 4-5" and fixed to the uprights just to give a wee bit more protection from the elements and prevent the high winds doing ill to the roof (our neighbouring syndicate just lost one of their doe boxes to a nothing special gale!).
For the groundworks, I first chapped in a fence post so it was more or less level with the top of the cage, on the inside of the cage footprint, and repeated in the diagonally opposing corner (the red and the blue, grapple fans!). Next, I fixed the pallet to the top of the cage and also the posts with screws and strapping, and also the cage horizontal bars where they were nearest the fence posts.
Lastly, I screwed the container base 'lip' to the pallet, againusing screws and penny washers.
The finished article is really meant for a one man affair, but offers good protection from the cooling wind, which can't always be said for the other types of more open seats, yet of course it ain't an "uber-hochstand" with all mod cons as used more over the channel.
tip: the cage makes an easy ladder to get into the box, but it's best to have the bottom edge/'lip' of the 'pop-hole' in the container more or less down to the pallet, i.e. With none to 1" of a lip rather than a 6" threshold to overcome. The picture shows the lip being about 3-4" high, but I took it down to closer to 3/4" after getting in and out once to see how it went. That's how I know the chain saw makes a decent and very quick job, if you're careful.
That's about it! I expect I may at some point in the future replace the pallet, but it's not as though that will be much of a problem, much less cost, all materials used are fairly cheap in the bigger scheme of things. Should it need to be shifted, being modular will make things fairly straightforward too; the tin snips can rapidly free the strapping of needs be.
Thanks for the inspiration to the earlier contributors with the double container seats, and I hope this is of help to others.
There's about 10 parts and a wee bit of fixings. Sitting comfortably? Then I'll begin.
1 x IBC container
2 x(or if you're feeling flush, 4!) fence posts
4 x 4"x 2" by appx 48" or less, depending on your own height and preference, with an eye to wind strength too, see later.
1 x pallet (can be pre-loved!)
1 x piece of Sterling board (or ply, disorientated strand board, etc!) about 5' x 2'6" to tack the roof on to;
1 x 3m sheet of steel cladding or Corrie iron, cut in half across, use whatever you have to hand or can obtain
couple lengths of 4" x 2" x50" or so - roof bearers
some tek screws, screws and flat washers, some strapping-on-a-roll
an old 5 gallon drum or similar for seat (bring a bit of padding according to your need!)
tins of tartan or real tree paint, to suit your environment and preference
Now put them all together, and it should look something like this:
View attachment 90462
Dissemble the cage bars bars which prevent the plastic container from 'escape'! An 8mm tek driver for the cordless drill is helpful and much quicker than a wee spanner. You may need an Allen bolt bit, depending on the type of nuts the cage bars are held in place with.
Once your container is free, cut out holes top, base and one side, according to where you envisage entry and exit, this one shown has the entry point on the leeward side of the prevailing wind. I left about 6" of a lip all round, I measured 6" in from the sides of the container and drew lines with a felt pen, and radiused the corners because I wanted it to be tidy, and was using a jigsaw to cut them out, but eg a chain saw and a steady hand would be much quicker and pretty much as good!
The lengths of 4' 4x2 for the uprights are then screwed into place from the inside, using 4-6 screws (5x60 or 50 are plenty) with penny washers to spread the tension from the screws and add grip, and roof pitch according to preference, I think there's a couple inches higher at front sloping to back on mine. From the top edge of the container, 22" at the front, and 20" at the back gives a decent run for the water over the back. I used the edges of the entry hole I had cut out as a guide to keep the uprights fairly vertical. On the other side, I just marked the alignment with a felt pen, which shows through to the inside of the container, it being slightly translucent.
Once the uprights are in place, I checked out an inch over the ends of the roof bearer 4x2's just to give a decent hold to the uprights, and screwed these on with some screws, plus a couple of lengths of strapping to firmly secure same.
At this point I gave the surface a going over with the blow torch, to help key the undercoat to the plastic. Lightest coat first, dead grass or agri undercoat sandy colour, then a bit of light olive, green bronze, and a little drab brown, I'm no Banksy, but it's fun, and less is often more! On the uprights you may see a few tek screws, I put these in to hold a bit of scrim netting to further blend in the cage, but I also anticipate the grass to gradually and eventually grow!
I assembled the roof on site, which makes the whole thing easier on the back of the trailer. Note that if you have a trailer that can accommodate only one container, you might be best to assemble all on site, as once the roof upright supports are screwed on, you won't be able to slip the plastic shell back into the cage. An 8 foot trailer will easily take the cage and container though, with the pallet under the cage for transport.
For the roof, I laid the piece of Sterling board over the roof supports, and screwed it down with 5x 30 screws. Next the two pieces of cladding were overlapped and fixed using 25mm tek screws, the ones with pointed ends for attaching cladding to wood. Lastly the loose sides were pulled down about 4-5" and fixed to the uprights just to give a wee bit more protection from the elements and prevent the high winds doing ill to the roof (our neighbouring syndicate just lost one of their doe boxes to a nothing special gale!).
For the groundworks, I first chapped in a fence post so it was more or less level with the top of the cage, on the inside of the cage footprint, and repeated in the diagonally opposing corner (the red and the blue, grapple fans!). Next, I fixed the pallet to the top of the cage and also the posts with screws and strapping, and also the cage horizontal bars where they were nearest the fence posts.
Lastly, I screwed the container base 'lip' to the pallet, againusing screws and penny washers.
The finished article is really meant for a one man affair, but offers good protection from the cooling wind, which can't always be said for the other types of more open seats, yet of course it ain't an "uber-hochstand" with all mod cons as used more over the channel.
tip: the cage makes an easy ladder to get into the box, but it's best to have the bottom edge/'lip' of the 'pop-hole' in the container more or less down to the pallet, i.e. With none to 1" of a lip rather than a 6" threshold to overcome. The picture shows the lip being about 3-4" high, but I took it down to closer to 3/4" after getting in and out once to see how it went. That's how I know the chain saw makes a decent and very quick job, if you're careful.
That's about it! I expect I may at some point in the future replace the pallet, but it's not as though that will be much of a problem, much less cost, all materials used are fairly cheap in the bigger scheme of things. Should it need to be shifted, being modular will make things fairly straightforward too; the tin snips can rapidly free the strapping of needs be.
Thanks for the inspiration to the earlier contributors with the double container seats, and I hope this is of help to others.
Last edited:


 , nothing else needs to be said!


 oh add a cup shelf
  but very good use of an old IBC