Knife project #5: first attempt with RWL34 stainless

Araldite sucks. Cleaning up the slabs today the sand paper was clogging with Araldite spall IMG_5444.webp . Unlike any other epoxy I have used where it dries hard and machines off like wood or steel dust, this Araldite is balling like hard wax IMG_5443.webp
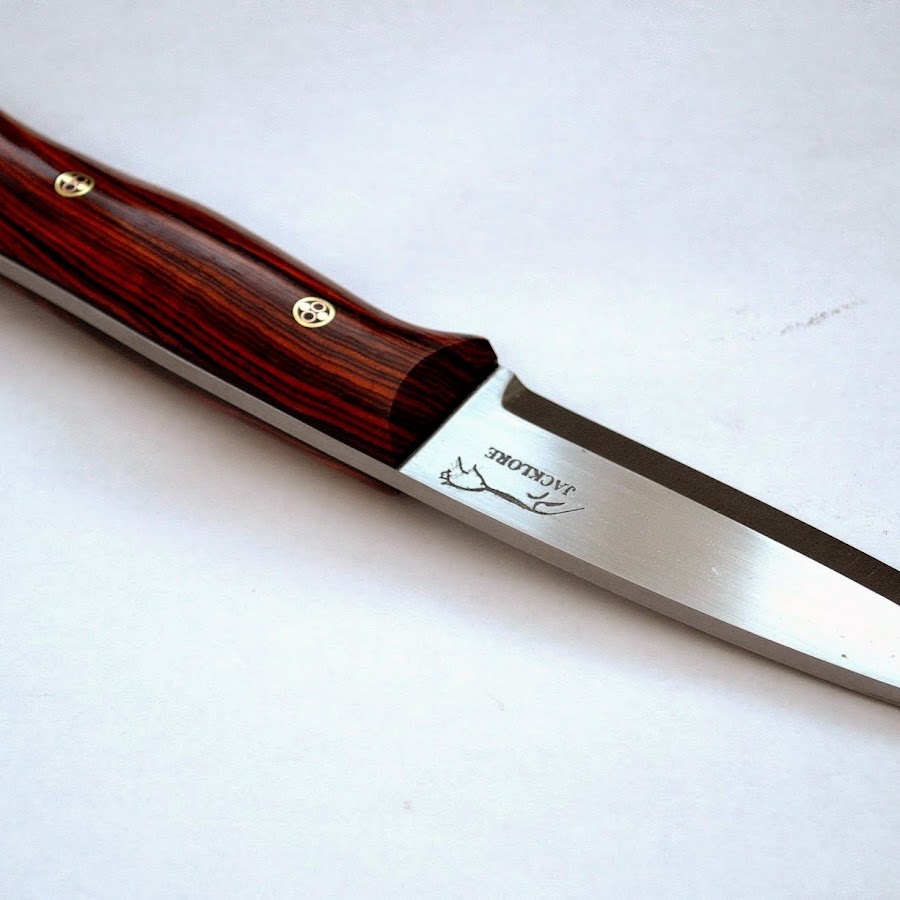
. Damn ugly and it makes me nervous about longevity. But, like all knives at this point in the making, it is starting to emerge as the swan it really is IMG_5452.webp IMG_5453.webp
 
The shaping of the slabs is perhaps the "arty" part of a knife build. It is 3D sculpting. And it is iterative: you do a bit of sanding, offer it up to the hand, decide where material needs to be shaved, and so on. First I reamed the thumb and forefinger grips using the linisher IMG_5455.JPG. Next I machined a divot where fingers and heel of hand clamp near the rear of the handle IMG_5456.JPG. Then I used a combination of linisher and hand-wielded sandpaper to integrate the shape into a tactile grip that fits my hand IMG_5460.JPG. I have found that using sandpaper cut into thin strips is useful for smoothing complex curves via a seesaw/flossing action IMG_5461.JPG. I have to say I am very happy with the ebony. It is tight-grained and gorgeous now it is polished IMG_5463.JPG. Cuppa tea and then on to sharpening...
 
I suppose I should be happy. Thrilled even. The heat treat has delivered a phenomenal hardness. I have yet to quantify, save this: I have spent 3 hours using a Lansky coarse stone and achieved very little IMG_5465.webp IMG_5466.webp. Once sharp, this will never need sharpening again!
 
Looking good, I'm glad Im not the only one to find that with araldite, I normally do my rough shaping with a disc sander and it clogs them very quick especially with wood, with the kirinite handles it seems to clean the disc as it does, I will have to try the gorilla version when I finish up what I have.
 
I am calling that good IMG_5495.webp. You can fuss chasing the next level of sharp to no great purpose. It is a bit like load developing 0.25 moa groups for a .30 cal you plan to use in a woodland stalking environment. It is sharp enough to gralloch a deer or boar with ease. And it was that hard to grind I am sure it will remain sharp for a long time.

The new RWL34 knife is sat in front of its prototype predecessor [1080 taken to 55Hrc] made last month. Next job is to make a sheath...

IMG_5498.webp
 
Looking good, I'm glad Im not the only one to find that with araldite, I normally do my rough shaping with a disc sander and it clogs them very quick especially with wood, with the kirinite handles it seems to clean the disc as it does, I will have to try the gorilla version when I finish up what I have.

Just be aware that the excellent Gorilla epoxy comes in two drying speeds. I would suggest avoiding the 90sec variant as it grants very little time to re-position/clamp slabs. The 5min working time/24hr curing time is king.

1602102506506.webp
 
Great post and lovely work. I will one day make time for a similar project and will use some of this for reference. Thanks and enjoy your continued learning experience.
 
From the time and effort it took to sharpen the hardened blade with a Lansky, I knew that this RWL34 was harder than anything I have sharpened before. But how hard? Today I tested the top edge of the tang perhaps 15mm back from the ricasso with my Tsubosan files.


It is right on the money per the recipe used. Tsubosan declares it to be between 60Hrc and 65Hrc which is what the sequence promised Heat_treat_for_62hrc.jpg IMG_5503.JPG

It actually took some force to get the 65Hrc file to make the shallow scar you see below.

My takeaway from this is that I will risk putting a final edge on the next RWL34 before heat treat and see how that fares. Half a day to put an edge on 62Hrc+ is avoidable, surely?


IMG_5504.JPG
 
Obviously to take this knife with me on a stalk, I will need a sheath. The sheath I made for the last knife is ok, but not perfect. The grade of leather has a shagpile-esque knap and is too soft to retain structure post wet-forming IMG_5254.webp IMG_5252.webp. So I shopped for a heavier guage of leather and show the two side by side for comparison IMG_5501.webp. I am going to try wetting this new leather, but it feels too stiff to mould to shape IMG_5502.webp. So I am considering a more traditional sheath design that marries two flat sheets of leather...
 
Do like you have with the leather, and roughly follow what I have shown, not sure if I have shown folding but wet down the inside and outside of the fold line, maybe a inch wide and then fold and work the crease with your fingers so the edges line up, then glue and stitch, this should give a flat sheath to work with, you can then fill it with water for maybe 15 seconds, tip out and push the knife in and work the leather into the form you want, or if you don't want a defined shape (this is what I normally do) when I'm waxing the sheaths I go over them with a heat gun to help the wax soak in and then just push the knife in when still warm and I find the sheath relaxes and takes its own form.

Hope this helps
Snake
 
Spurred on by Snake's encouragement, I have been wrestling with the 4mm veg tanned hide and the sheath is coming along just fine. Not included here is the wet-forming step [sheath already in airing cupboard drying] but if I have to re-do that step, I will take pics then.

IMG_5515.JPGIMG_5516.JPGIMG_5517.JPG
 
Where did you purchase the linisher?

My kids bought me a day 'experience' knife making with Graham Clarke near Swindon, went there last Saturday with my kids and daughters boyfriend.
It was great fun, and I also took up a knife which he hardened.
But of course he had SO many 2x72 linishers I was frustrated I don't have one.
He did suggest I buy a Clarke from Machine Mart as it will only be a hobby for me.

Cheers

Richard
 
Where did you purchase the linisher?

The linisher I have is really a hobbyist affair. The belts are just 30mmx533mm.

It is really useful though, and the variable speed feature and tight radius over the top pulley affords a good deal of control on fine work.

The model I bought was their initial market offering. It did not have the bells and whistles they now offer for the knife maker:

 
Woohoo. Things just get better and better. This week the new owners moved into the house next door. Geoff, it turns out, is a french polisher! He cast an eye over my fledgling knife handle efforts and gave me some valuable pointers. Principal amongst them is to finish applications of oil/wax by hand with a cloth. He pointed out that any other applicator is prone to leaving brush marks or variable thickness.

So, here is the wet formed sheath and hand-waxed handle:

IMG_5524.webpIMG_5518.webp
 
Last edited by a moderator:
I’m in awe of you, so nicely written and fascinating content throughout. I’m lacking many of those essentials but inspired and at some time would like to have a go and if it’s 10% as good will be thrilled.
Thanks for sharing.

an engraving of your signature on the blade would be a nice touch maybe
 
I’m in awe of you, so nicely written and fascinating content throughout. I’m lacking many of those essentials but inspired and at some time would like to have a go and if it’s 10% as good will be thrilled.
Thanks for sharing.

an engraving of your signature on the blade would be a nice touch maybe

Far too generous. Truth is, getting competent at a skill like this is not as hard as most of us think when looking from the outside in.

I have always been DIY capable but not craft/artisan material. The usual: shelves, plugs and taps were my mainstay.

My career was as a keyboard warrior looking after Cisco, Bay, Hughes, Nortel global extranets. [a.k.a. type of internet but private to banking industry]

I have had no shaolin-monk-grasshopper knife-tutelage journey. For me it has been a wonderful trial-and-error experience navigated by the light of wisdom in clips on YouTube in the study, interspliced by shuttle runs to the tools in the garage and with episodic detours via the first aid kit in the bathroom.

Per the Nike tag line, Just do it. You won't regret it. Everyone started somewhere.


For inspiration and technique, here are some of the doyens of knife-making whose videos pointed my way:


The last one is just aspirational eye-candy really:

 
Just be aware that the excellent Gorilla epoxy comes in two drying speeds. I would suggest avoiding the 90sec variant as it grants very little time to re-position/clamp slabs. The 5min working time/24hr curing time is king.

View attachment 177071
 
Back
Top