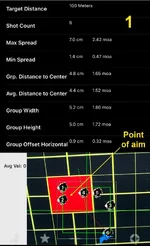
Didn't appreciate it until last week when I fitted my new GRS Bifrost onto my Tikka T3X SV in 243. Fitted it easily but didn't really pay attention to the screw torque until I took it out to check the zero and was really shocked at the result. Photo #1 is of two groups of three, not rushing and shooting off bags @ 100m. Wind was gusting a little but not strong. I even videoed (scope is a c50) because I thought I was doing something wrong.
Went away and found a video of two guys showing what happens when you adjust the torque on a .22 at 50m. They showed a sequence of targets at regular changes in torque and it was very helpful.
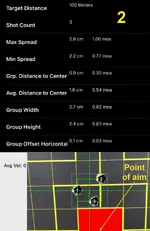
Photo #2 is 5Nm on the front screw and rear screw as tight as possible without catching on the bolt (wouldn't tighten to 5Nm without blocking the bolt)
Photo #3 is 4 shots at 4Nm on the front and loosened slightly on the rear
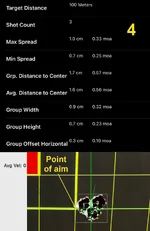
Photo #4 is after adjusting vertical, leaving the front at 4Nm and tightened slightly back up on the rear (screw was flush to the channel the bolt slides along). Haven't uploaded the next one where I adjusted the horizontal.
Lesson learned and it cost me some ammunition to do it but I'd much rather learn on a target!
Went away and found a video of two guys showing what happens when you adjust the torque on a .22 at 50m. They showed a sequence of targets at regular changes in torque and it was very helpful.
Photo #2 is 5Nm on the front screw and rear screw as tight as possible without catching on the bolt (wouldn't tighten to 5Nm without blocking the bolt)
Photo #3 is 4 shots at 4Nm on the front and loosened slightly on the rear
Photo #4 is after adjusting vertical, leaving the front at 4Nm and tightened slightly back up on the rear (screw was flush to the channel the bolt slides along). Haven't uploaded the next one where I adjusted the horizontal.
Lesson learned and it cost me some ammunition to do it but I'd much rather learn on a target!