My First London Oil Finish

PostmanPat

Well-Known Member
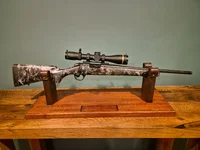
I have decided to refinish the stock on what was my son's first shotgun. He has since grown out of it, and the stock could do with some TLC. I am also using it as a practice run as I intent at some point soon to re-stock both my stalking rifle. The first will be for my 'wet weather' rifle, in an affordbale walnut blank, and if all goes well a high grade Rigby Highlander style stock on a Shultz & Larsen. The intention to turn the latter into a bit of an Heirloom, with family engraved brass oval, fitted to me etc.

Anyway on the write up

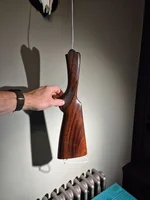
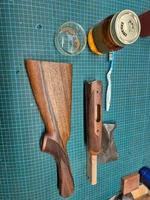
I will be writing as I go and have already learned a few lessons that hopefully will be useful to someone. I began by stripping down the gun and then raising the old finish with meths, 0000 wool and a toothbrush.

20250929_173533.webp20250929_173544.webp20250929_180710.webp
 
Last edited:
Next I sanded from 80 to 400 grit. The large dent on the initial picture along with a few other smaller ones were pretty deep, so I then took the stock inside and did a few rounds of steaming with a wet towel and iron to raise them. Then went back to sanding.
20250929_185928.webp20250929_193917.webp
 
At this point I decided to improve the wood to metal fit on the action. Which I did with some sharp chisels and small files. There are two of my first lessons learned here. Firstly, I should have done this before any sanding, secondly, I should have done all this work with the action attached, whereas I did the chisel work here, and then went back to sanding, and much to my annoyance, I knocked a could of the corners of slightly, and it is not as perfect as I would like. although around the trigger tang and safety etc it is immeasurably better.
20250929_212305.webp20250929_215349.webp20250929_215353.webp20250929_215422.webp20250930_092702.webp
 
Once done with that, I sanded up to 800 grit and started researching finish recipes. In general gunmakers are pretty secretive about exactly what they do here but I found a few different write ups:

Making oils for gun stock finishing - the chap that writes this blog seems to be very well respected
Traditional Oil Stock Finishing - A great write up from someone on a similar journey to me

You can also buy multiple over the counter products now by Trade Secrets & Napier - just a quick note here that Tru Oil is not a London finish - it is a plastic varnish mix, and not to rant, but I do not like plastic on wood.

In short - I decided to make my own, inspired by bits I have read but different. I have made wood finishes in the past and I liked the idea of the finish that adding beeswax and carnauba wax to the mix would get, both of the write ups above opted to use it, but it will make it sit on the surface slightly more. So I opted to make two batches, one for early coats that is a deep penetrating finish, and another with waxes to build shine.

20250929_194057.webp20250930_175544.webp

My recipes:

Batch 1 – Penetrating oil
  • Boiled linseed oil – 200 ml
  • Pure tung oil – 100 ml
  • Gum turpentine – 180 ml (increased for deeper penetration)
  • Terebine drier – 10 ml

Cold Mix: Start with Linseed, slowly stir in the Tung, then terps, then Drier - mixing well throughout

Batch 2 – Finishing oil with wax

  • Boiled linseed oil – 250 ml
  • Pure tung oil – 120 ml
  • Gum turpentine – 120 ml
  • Terebine drier – 10 ml
  • Beeswax (melted) – 10 g
  • Carnauba wax (melted) – 3 g

Set up a double boiler (ideally outside). Warm the oil/turpentine mixture gently and add the waxes, stirring until fully emulsified. Stir in the Terps, remove from heat and allow to cool to warm, stir in the drier (adding it early can reduce its effectiveness), keep stirring for a few minutes and decant. Carnauba will give you a harder, glossier surface, while beeswax adds a softer lustre and a bit of water resistance. Use this batch only once the grain is fully filled and the early coats are well cured.
 
Nearly time for the first coat!

I raised the grain with water and a heat gun, then sanded back first with 800 grit, then with 0000 wool.

First sealing coat - I used the lightest touch of my pen oil all over, inc chequering, hand rubbing it in, then I sanded while wet (if you can even call it wet) with 800 grit, hand rubbed, and immediately rubbed down with a lint free cloth. I will do a number of these coats to seal the grain. I have also saved some sawdust from sanding earlier to aid this. I will rub down with 0000 wool before every coat.

I have actually order the Trade Secrets grain sealer and Alkanet oil - but it hasn't arrived yet and I am keep to crack on, so starting it the old fashioned way.

Picture below is after one coat and it already feels silky smooth

20250930_204738.webp
 
At this point I decided to improve the wood to metal fit on the action. Which I did with some sharp chisels and small files. There are two of my first lessons learned here. Firstly, I should have done this before any sanding, secondly, I should have done all this work with the action attached, whereas I did the chisel work here, and then went back to sanding, and much to my annoyance, I knocked a could of the corners of slightly, and it is not as perfect as I would like. although around the trigger tang and safety etc it is immeasurably better.
View attachment 439608View attachment 439609View attachment 439610View attachment 439611View attachment 439612
Proper tools and a proper wood bench, nice.
 
Thanks. I thought you might enjoy a peek at the tool wall and wood storage, which is still under construction. I am about to start building a new workbench. I began one last year but ending up deciding it needed to be bigger still, and so my previous project became a very hefty side table of sorts.

I am now 5 days and 5 coats into the finishing, and I think this is likely as far as I should go before doing the Alkanet stage, so hoping it turns up before the weekend.
 

Attachments

  • 20251001_171028.webp
    20251001_171028.webp
    267.2 KB · Views: 125
  • 20251002_081503.webp
    20251002_081503.webp
    353.8 KB · Views: 123
There are some nice shades of green wood dye out there! Both water and spirit based.

Black ink and feather to add both 'interest' and even up the darker grain streaking might be worth considering before applying the oil finish. You can easily cut back the inked areas with 0000 wire wool if you overdo it or wish to soften edges.

K
Thanks for your message - I would have to see a few of these methods done before decided whether to use them on a stock of mine.
 
The Trade secret oils did arrive just after my last post so this morning I put the third coat of red oil on. I decided not to use the grain sealer, given that I had done 5 sanding and saw dust coats already (I am not sure if it was fully sealed, but it certainly felt smooth to me).

These coats were slightly heavier than my first 5, as they really were as light and hand rubbed in as you could get. For these I let a thin film sit on the surface, but it didn't really get to the tacky stage as the wood was quite thirsty. I have also decided to bring the stock inside, as it is getting a bit cold in the workshop. Picture was taken moments ago, with wet red oil on. My first ever deer is making a great stock hanging aid.
 

Attachments

  • 20251004_071243.webp
    20251004_071243.webp
    221 KB · Views: 123
The Trade secret oils did arrive just after my last post so this morning I put the third coat of red oil on. I decided not to use the grain sealer, given that I had done 5 sanding and saw dust coats already (I am not sure if it was fully sealed, but it certainly felt smooth to me).

These coats were slightly heavier than my first 5, as they really were as light and hand rubbed in as you could get. For these I let a thin film sit on the surface, but it didn't really get to the tacky stage as the wood was quite thirsty. I have also decided to bring the stock inside, as it is getting a bit cold in the workshop. Picture was taken moments ago, with wet red oil on. My first ever deer is making a great stock hanging aid.
Warmth is good, just keep applying coats of oil - red oil builds up depths of contrast and colour, clear oil once it has sufficient colour. Let it dry till tacky then sand in the next coat. Use 600 grit red garnet sandpaper. It will take time - you need about 20 coats. It will suddenly “pop” once all the grain is full. Then keep applying coats of just a clear oil, once tacky, buff off and repeat.

Then leave the stock well alone to cure. Linseed oils, even with dryers take time to cure and harden. And when removing the finish, use a sharp cabinet scraper but just lightly dragged over the surface. This takes off just the finish and none of the wood. By all means raise the grain by wetting but then apply first coats of oil and sand that back into the wood - again avoids removing very much wood and the slurry fills the grain.

For buffing I like a piece of old cotton jeans or mutton cloth. Once your base coats have hardened properly you can really start building a polished finish. A coat or two of oil, let it harden, then polish off.

When polishing off you can use a very fine polishing compound. Traditionally fine pumice or rottenstone is used. This can also be used in the build up coats.

But don’t use traditional black wet and dry paper, it leaves a greyish slurry which builds up in pores. It looks horrible.

Going back to the beginning, do all your steaming out of dents before removed the previous finish. You get a much better end result.
 
Thanks. I thought you might enjoy a peek at the tool wall and wood storage, which is still under construction. I am about to start building a new workbench. I began one last year but ending up deciding it needed to be bigger still, and so my previous project became a very hefty side table of sorts.

I am now 5 days and 5 coats into the finishing, and I think this is likely as far as I should go before doing the Alkanet stage, so hoping it turns up before the weekend.
Oh I bet it smells so good in there. Cracking step by step write up thanks.
 
What a genuinely interesting and informative write up, in fact, so much so, it has completely convinced me that I know that there isn't a chance in hell of me ever bothering with my guns, I'll just pay the money for someone else to do it ☹️. Sad I know but at least I'm truthful!
 
What a genuinely interesting and informative write up, in fact, so much so, it has completely convinced me that I know that there isn't a chance in hell of me ever bothering with my guns, I'll just pay the money for someone else to do it ☹️. Sad I know but at least I'm truthful!
Out of curiosity, how long do you think it actually took you?
 
Thanks all for the comments. I am still going. In fact, I actually think I need to take a step back to go forward. I have been doing two coats a day for a while with my second mix and not really noticing the depth build up I want. After asking Chat GPT for some thoughts, it seems that my second mix has too much wax to really achieve a London finish. To quote:

"Yes, you can keep layering the same mix.
⚠️ But after a few coats, you’ll mostly be re-melting and redistributing wax — not deepening the finish."

So - I am going to let it cure for 3 days - lightly cut off the surface wax with a bit of terps - and then go back to layering my first mix (potentially just adding a very small amount of Carnuaba to that mix - as both the Purdey and Vintage guns recipe used the same. My initial logic for having a slightly heavier wax blend in the mix was frankly, because that is the kind of homemade wood finish I have used in the past, and I thought it might fill the pores and build a bit faster - I was wrong. The second photo is my homemade mahogany gun cleaning stand on a homemade 200 yr old French oak table - both finished with a similar mix and it looks lovely - both only have 3 coats - but not that classic London oil, glass over walnut look I going for!

In terms of how long - it will take months - it is certainly only worth doing if you enjoy woodworking as a hobby - otherwise it is a complete waste of time tbh - you could achieve a lovely finish with few coats of my second mix - you don't 'need' a 30 coat London oil finish

On the plus side in learning to do it - because it is so time consuming, getting someone else to do it will cost a lot of money - and it isn't rocket science (he says having clearly made a mistake trying to make it go faster) - I looked on the Rigby website the other day to price up a .275 Highland Stalker - to upgrade the finish to London oil cost an additional £2.5k. Obviously a decent independent will do it for less, but it won't be cheap. You can do it yourself for 15 mins a day once the prep is done - and about £50 in materials (once the mix is made you could finish many guns with it).
 

Attachments

  • 20251007_201714.webp
    20251007_201714.webp
    229.5 KB · Views: 143
  • 20251008_091521.webp
    20251008_091521.webp
    104.3 KB · Views: 142
You should read @Olaf technique.
Lots of patience required!
 
You don’t really need wax. I know a couple of very good gunsmiths who are specialists in old fine guns, especially Scottish who use nothing more than good high quality (as in from an artshop) boiled linseed oil. Pretty much all I used on the few below. The middle one is an AyA No3 that had a nasty varnish type finish, stripped it off and started again. The others all had pretty tired and grubby finishes which I have cleaned up. All of them used and taken out even on wet days.image.webp
 
Last edited:
Back
Top